
This article will explain the process of compiling Numpy from scratch for Maya Python (2.7) on windows.
But why?
Why would anyone opt to compile Numpy package from source for maya, manually, instead of grabbing one from prebuild wheels such as These?
There are number of possible reasons for attempting this, be it avoiding Anaconda or MKL licensing, or customization requirements. Whatever it may be, if you've stumbled upon this page via search, I'd like to assume you have a good one.
Additionally, the fact that version of Visual Studio that built MayaPy itself used to change from release from release, introducing breaking ABI changes meaning that recompiling every packages for a specific Maya version used to be a requirement to get Python extension modules working properly in MayaPy. Although recent changes in Visual Studio has alleviated this somewhat.
The process
The process of building Numpy itself is similar to building any other packages requiring compilation:
- Acquire package's source repository
- Set up Visual Studio
- With C++ and VS2015/2017 compilers installed
- Prepare MayaPy for Python build
- (Optional) Lots of packages has Cython as dependency so it might be good idea to have one built in advance.
- Add the necessary management packages that MayaPy does not shipped with: pip, setuptools, and wheel
- Relocate MayaPy's include and lib files to place MayaPy expect them to be
Then, executing the command below should yield us a distributable wheel package. (Or installed directly via install command)
mayapy.exe setup.py bdist_wheelHowever, a proper Numpy module depends on accelerated backend package to function as expected. (Note: It is also possible to build python-only version of Numpy without any optimizations.)
for this compilation, we choose the same backend as PYPI distribution, OpenBLAS
Building the BLAS backend (OpenBLAS)
Note: Since version 0.3.10 windows binary has also been released along with the source code. But be ware that it was build using default setting so we still have to build if we wanted to customize.
https://github.com/xianyi/OpenBLAS/releases
There are number of ways to compile OpenBLAS on windows but for our demonstration we will follow the 2. GNU (MinGW) ABI route with with MinGW64 environment from MSYS2 https://www.msys2.org/.
Note: MinGW64 support was still are marked as "experimental", however, this is also how the PYPI distributed Numpy for windows were compiled.
https://github.com/numpy/numpy/blob/maintenance/1.16.x/azure-pipelines.yml
Preparing the build environment.
- Update MSYS2 using pacman package manager
pacman -Syu --noconfirm - Install both c++ compiler, gcc, and fortran compiler, gfortran, and additinally cmake, git from the repository, following these instructions.
https://www.msys2.org/
https://www.devdungeon.com/content/install-gcc-compiler-windows-msys2-cc
Which would typically be:
pacman -S --needed base-devel mingw-w64-x86_64-toolchain git - Confirm that both gcc and gfortran were install in the build environment.

Next, we clone or download the OpenBLAS sources.
https://github.com/xianyi/OpenBLAS
The OpenBLAS project recommends against using master or development branch in production and we should heed this warning. We will be using the latest stable release at the time of writing. (0.3.13)
Navigate MinGW console to the OpenBLAS source code root folder and use the following command to compile.
On 8 core processor, this will usually takes half an hour to complete.
make \
-j 4 \
BINARY=64 \
HOSTCC=gcc \
CC=gcc \
FC=gfortran \
CFLAGS='-static -static-libgcc -static-libstdc++ -fopenmp' \
CXXFLAGS='-static -static-libgcc -static-libstdc++ -fopenmp' \
FFLAGS='-static -fopenmp' \
BUILD_WITHOUT_LAPACK=0 \
NOFORTRAN=0 \
DYNAMIC_ARCH=1 \
USE_THREAD=1 \
USE_OPENMP=1 \
NUM_THREADS=64 \
MAKE_BUILD_TYPE=Release
Explanation on some common argument used in this command:
-j: Result may varies depending on system but the build sometime fails with high worker counts.
CFLAGS/CXXFLAGS/FFLAGS: flags passed down to c/c++ and fortran compiler respectively.
We compile with "-static" flags to statically link MinGW runtime into compiled binaries. This is optional but it allows us to combine all dependencies into a single DLL file.
BUILD_WITHOUT_LAPACK/NOFORTRAN: Force OpenBLAS to compile fortran.
DYNAMIC_ARCH: Without this command, the final product will only have optimization for the CPU that compiled it baked in. This command will enable optimization for user's CPUs
USE_THREAD/USE_OPENMP: Force OpenBLAS to use threading features via OpenMP for Maya compatibility.
NUM_THREADS: Apparently this needs to be set at high number at built time or OpenBLAS will refuses to use all available CPU cores.
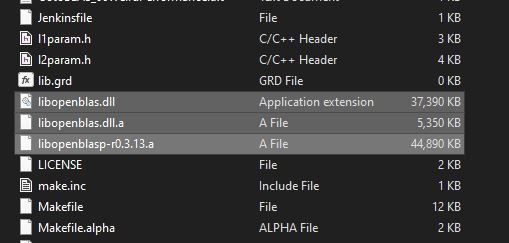
If the build were successful, new files called "libopenblas.." will be created in the build root directory. Copy or relocate these files to a folder of our choosing.
For this demonstration we will be placing it in a folder next to Numpy source folder called opt\0.3.13-omp\lib
After that, rename libopenblas.dll.a to openblas.lib
Building and packaging
With OpenBLAS binaries ready, next we proceed to build and package Numpy for distribution.
First, we check out Numpy's source from official repo. We will be using 1.16.x maintenance branch since it is the last official Python2 supported maintenance branch. https://numpy.org/devdocs/release/1.17.0-notes.html
1.16.x will be the last version of Numpy ever supported on python2 so keep that in mind when you have to hunt for compatible downstream modules. (Unless you're keen on maintaining Numpy package yourself)
https://github.com/numpy/numpy.git
Modify the site.cfg file according to instructions, point all acceleration packages to our newly created BLAS binaries.
https://numpy.org/devdocs/user/building.html
https://github.com/numpy/numpy/blob/maintenance/1.16.x/site.cfg.example
[DEFAULT]
library_dirs = ..\opt\0.3.13-omp\lib
include_dirs = ..\opt\0.3.13-omp

[openblas]
openblas_libs = openblas

[blas_opt]
blas_opt_libs = openblas

[lapack]
lapack_libs = openblas

[lapack_opt]
lapack_opt_libs = openblas
At this point the process of building Numpy is identical to every other python module compilation and should be pretty much straight forward.
Setup MayaPy for compilation.
Copy the python include and library files from either Maya installation folder or the devkit and place them where MayaPy expects them to be.
import distutils.dist
from distutils.command import build_ext
bld_ext = build_ext.build_ext(distutils.dist.Distribution())
bld_ext.finalize_options()
print(bld_ext.include_dirs)
# ['C:\\Program Files\\Autodesk\\Maya2018\\Python\\include',
# 'C:\\Program Files\\Autodesk\\Maya2018\\Python\\PC']
print(bld_ext.library_dirs)
# ['C:\\Program Files\\Autodesk\\Maya2018\\Python\\libs',
# 'C:\\Program Files\\Autodesk\\Maya2018\\Python\\PC\\VC6']
Build Numpy! (Maya 2018)
We will be building wheel package for distribution
"c:\Program Files\Autodesk\Maya2018\bin\mayapy.exe" setup.py bdist_wheel
Activate the Visual Studio build environment
In case your MayaPy's distutil fails to pick up the correct build environment try to give it some encouragement by:
*Note: MayaPy's VisualStudio version may differs depend on your Maya version.
- Add VS2015's vcvars32.bat to current path
C:\Program Files (x86)\Microsoft Visual Studio 14.0\VC - Manually activating the build environment for MayaPy by calling
"C:\Program Files (x86)\Microsoft Visual Studio 14.0\VC\vcvarsall.bat x86_amd64"
Check your results!
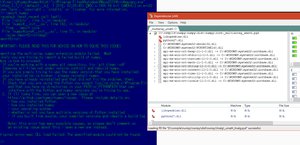
Dependency Check
At this point "import numpy" will probably fail because the required DLL file(s) generated in build OpenBLAS step is still missing.
Check the newly generated wheel package in numpy/dist directory.
wheel packages are simply zip files, which make it possible to extract in place and conduct quick checks. Extracting wheels file into local directory makes it the highest load priority module. With that done, copy over the "libopenblas.dll" created previously to numpy/core folder.
Also at this step. if you had opted out of static compilation, you will have to hunt down all other necessary DLL files using dependency finder utilities.
Once "import numpy" succeeds, add the necessary DLL files back to the wheel package.
Now we have a custom distributable Numpy package!
Example install:
"c:\Program Files\Autodesk\Maya2018\bin\mayapy.exe" -m pip install \path\to\wheels\numpy-1.16.7.dev0+12daed7-cp27-cp27m-win_amd64.whl
Sanity Check
Numpy does have a build in test suite which unfortunately depends on PyTest module which have to be compiled separately for Maya and only works on older version.
import numpy
numpy.test('full')
Use benchmark script, such as this one to gague your newly compiled Numpy performance against the standard ones.
https://gist.github.com/markus-beuckelmann/8bc25531b11158431a5b09a45abd6276
The final performance will vary with build settings, OpenBLAS/Numpy version, threading related environment variables and many other factors so play around until you get an acceptable result.